16:9 Study

Added on by John Sturr.

I've seen the this format for a while -- and I didn't give it much thought, as I'm a bit of a purist.  Ok -- I"m a purist. 

But I decided to push the envelope - and crop:  "go figure" and then -- get this -- crop 16:9.  

Wow -- ok - there's a lot to digest there.  

As MJ would say -- I'll let that "simmer".

400 S.

Added on by John Sturr.

These are some of my favorites of the walk from the office to the Trax Friday evening.

It's very satisfying to anticipate a shot - adjust camera settings on the fly - and then compose and shoot.

The first "real" images with the Sigma 30mm f2.8 - fov at 45mm - and I love the sharpness.  This lens is a keeper for sure.

Some of this set will be in this years Top Ten.

Time Lapse - Update

Added on by John Sturr.

So -- in order to get the most visual impact of plant "growth" -- keep this in mind -- use a short interval - I eventually used a 2 min interval -- for 24 hours and compiled at 30 fps.  

I wish I could have increased the hourage, but that's the limit on this app in the conventional setting.  The default setting may have some more flexibility - but my brain was in knots trying to figure it out.

I would like to spend some more time on this -- but it's a bit of a dance to align everything - get the lighting - of which I would need more of - and of course time.  So - in that regard - I've decided to just enjoy the orchids for now.  But it's still a cool process.  Meaning - I can't compete with the pros and get what I really want - so I'll quit while I'm ahead.

Orchid Time Lapse

Added on by John Sturr.

My wife's iPhone is in need of a microphone replacement - and until I can fix it, (we've since bought a new one) I've decided to use it as a time lapse camera.

Screen Shot 2013-01-30 at 9.14.17 PM.png

I grow orchids, and this season they are growing like crazy -- I have 4 with new spikes - all within about 2 weeks of each other.  I've never seen that happen, and I have no reason why.

So -- as I check on these - I would swear they grow about 1 cm a day -- and so I decided to set up the iPhone as a time lapse camera.

I installed "Time Lapse" -- about 4 bucks - with a tripod - and an overhead light - setting the App to take a frame every 15 seconds -- for 12 hours - the app then will combine all frames to a movie ready to upload to youtube.

Lessons learned -- Interval is too quick -- should be about 1 minute - to get the full effect of growth.  The HD upload option to youtube will be used also.

And -- I need to set this up for at least 24 hours -- and ideally "days".

2013-01-30 07.45.02.jpg

But -- wow -- what crazy technology to have in the palm of your hand.

I'm running it again today -- for 24hr and a 1 minute interval.  I'll post when that is complete.

Natural History - SLC

Added on by John Sturr.

I didn't expect to make any keepers - but it all came together.  A quick tour of the new Utah Natural History Museum - commissioned by Ennead Architects - http://ennead.com, in NYC, provided the canvas.

M and I were a bit cooped up yesterday and we wanted some distraction - and although I was surprised at the $11.00 admission -- per person - we were all in.  I remember the Chicago days where Natural History and Science and Industry were; well -- just walk thru the door events.  How times have changed.

The spaces are definitely worth a look.  If you can afford it.

Lowlight - 2013 Goal

Added on by John Sturr.

I'm going to start the new year -- by taking a cue from photographer Luca Rossini - http://www.lucarossini.it/category/366nex/

His way with capturing the dramatic from the mundane is inspiring.  And I've always gravitated to the aesthetic of compositions in low light, and until recently I have had a difficult time with the mechanics until acquiring the Sigma 30mm f2.8.  f2.8 is not particularly fast - but at least it is constant.

Auto ASA is a sexy option - but I like to stay below 1600 and 2.8 will make that a bit easier - and it is really sharp.

Lowlight is the goal - now I just need to set aside the time to get out and shoot.

DVI vs. HDMI - whoa.

Added on by John Sturr.
2013-01-20 17.14.56.jpg

Every once in a while -- ok most of the time I think I've got it figured out.  I read the reviews, look at the boards - Google what I'm looking to find -- and I think I've got it.

Until I get my trash kicked…

Before Christmas I bought a MacMini -- cool - then hooked up the Dell 2408wfp and the colors were off.  Eventually I got the Spyder 3 pro working - calibrated both on the Apple side, and the Dell side.  Then I researched what others were doing - and adjusted by hand the R, G, B values - and eventually blogged about these adventures - and I considered all of my efforts a success.

But - there was still this tinge of overall green, and highlights here overly blown.  Humph.

**cut to the chase**  HDMI

So -- then I remember someone writing - ditch the HDMI and go DVI.  Whatever I thought.

I've been wracking my capacities for the last two weeks -- the colors have been giving me fits.  Out of desperation  I took heed - and dug out the DVI cable buried in the original box in our storage.  And as it turns out - that DVI to HDMI adapter, of which Apple kindly provides, is no small order to ignore.

Good GOD man !  - problems solved.

Adapt the DVI - plug it in - and miraculously I get a MAC colorspace selection - and some other stuff I haven't seen before -- and the dreaded HUE selection is missing -- thank you Jesus.

**long story longer**

HDMI sucks - DVI Better, and all is well - for now.  Just thought I would share.

Live View

Added on by John Sturr.

I Miss Live View !

There -- I said it.  Am I less of a pro ?  Do pro's only shoot through a view finder ?

Last week I sent in the Nex-7 for repair.  The rubber hand grip was peeling from the body and since the one year warranty is about to expire I wanted to get it into the shop for a free repair.

It's going on a week - and I miss it.  I've had to re-acquaint myself with the D3s.  A body I typically only use on a tripod when shooting paid work.  I love the D3s - it has taken me to new heights of product delivery and allowed me to rise above the crowd.  The Autofocus engine nails it all the time, every time.  When that focus point intersects the subject and the shutter is pressed - boom, done, in the can.  

But with the D3s- I can really only shoot thru the viewfinder.  I never realized how much I like shoot from the hip, as I've been doing with the Nex-7.  I've used Live View on the D3s a few times but the focus just isn't the same and the screen doesn't articulate.

Everyday I shoot with my iPhone -- where that screen is basically live view.  I'm used to it.  And as some say - "I need a viewfinder on my camera" - I say - I would prefer a touch screen with live view and no viewfinder.

Yet - a piece of hardware is just that.  A means to making a picture.

The Sony will be in my hands tomorrow.

Screen Shot 2013-01-17 at 8.59.32 PM.png

the Frame

Added on by John Sturr.

The digital world is now ubiquitous;  Music, Movies, TV, and the most impactful, Images.  I grew up shooting film - roll after roll of Tri-X and sometimes Plus.  Individually boxed and wrapped in cellophane, stored in the light safe closet in the room of the HS Yearbook adviser.  I shot an FM-2 with an off brand flash - you estimated distance between the flash and subject and hoped for the best.

But this is about the print - and the frame.

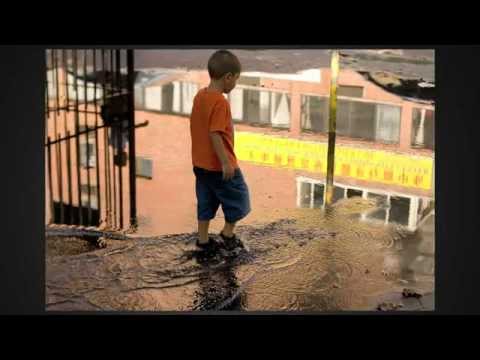
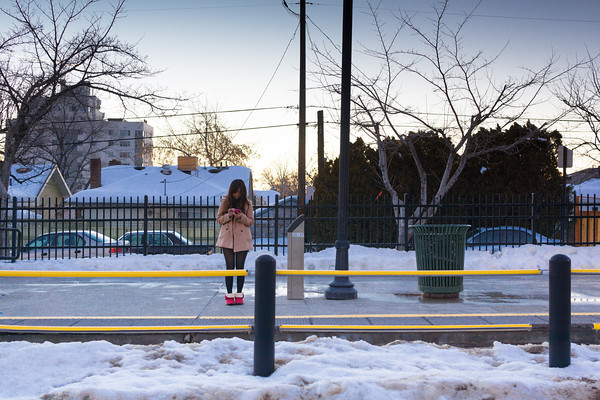
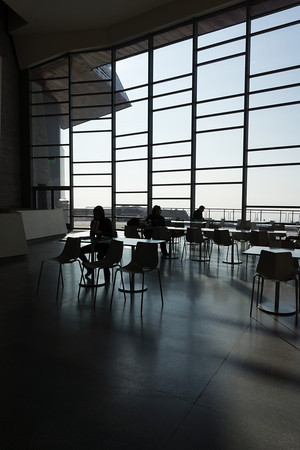
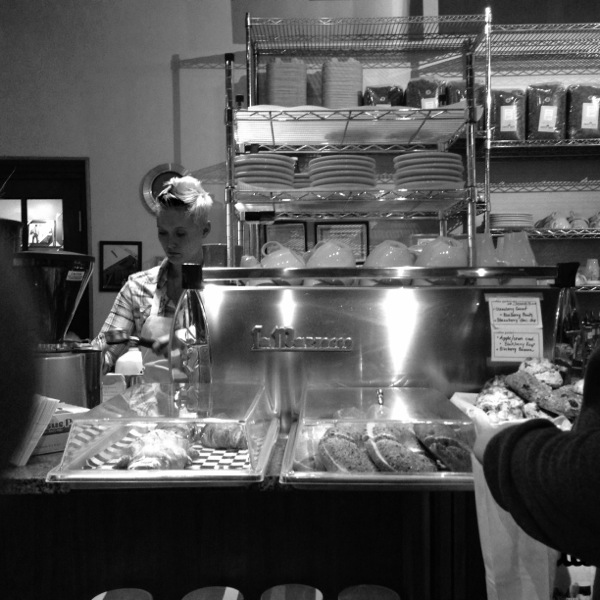
The firm put out a call for an employee art show, and I decided to prepare two prints.  The prints I had control of; one black and white and one color with both being on 13" x 19" Epson Hot Press Bright.  This paper has become my favorite of late - where the color of the paper is perfect with just the right amount of surface texture.

Framing was going to be the real challenge.  So I enlisted the help of my uncle, Edward Sturr, PhD., a large format B/W photographer known for his street work of the 1960's, http://www.prairielight.com/

We emailed back and forth - I knew what paper size I wanted to use, 13x19 but I had no idea of the proportions of the mount, border, offset from the print to the mat, etc.. etc.  Keeping the aspect ratio of the print was important - I knew that would not change with the mount and frame - so I had that figured out.

Here is what I came up with - after much discussion with my uncle.  All of this can be attributed to his experiences.

Frame is Metal - color is black and 16" x 20" - I ordered from Frames by Mail  - N94-21 MATTE BLACK.  I went online with the thought I would save some money with this whole process - but - I don't know if that ended up being the case.

Mat was ordered as uncut - I realized that I didn't want to anticipate sizing and order something pre-cut.  I would either cut it - or have it cut.  I decided to have it cut as I didn't have the experience to figure all of this out.  As I gain more muscle memory I will start cutting my own mats.

Mat opening is 1/4" from the edge of the print on Left, Top, and Right sides.

Mat opening is 1/2" from the edge of the print on the Bottom.  (deeper for penciled signature and title)

Mat border is 2" on Left, Top, and Right sides

Mat border on bottom falls where it falls.

Image on long side is 15.5" - Short side is proportionate and falls depending upon the adjustment of 15.5"

Frame with Mat, Plexi Glass, and Backing was $70 +

Assembly and Mat cut from Reuels Frame shop here in SLC was $50 +  The caveat was that the frame shop wanted to use their own mat - I had to play by their rules or walk, so I bought an extra mat with their framing services.  Like I mentioned before - If I knew what I was doing i would have cut the mat myself.

Glass was PlexiGlas because when ordering online that is the only option - and plexiglas doesn't impart any tint.  But - it holds static and is more difficult to keep clean during the frame assembly.  I still prefer glass - I guess I'm a traditionalist.

Attached is the drawn layout - the red border is the edge of the print.

After all is said and done the take away is two fold.  It's expensive to frame, and seeing your own work hanging on a wall, not locked up in a monitor or photo hosting site is damn cool.  I'll be framing many more even if it is just for my own enjoyment.

The only change I would make, moving forward; increase the mat border to at least 4" to add more whitespace.

The frames and mats add a polish and professionalism to a dying art in this digital age.

Picture Frame-Layout1.jpg

2012 Top images

Added on by John Sturr.

These are my top images to 2012; of casual moments mixed with some still life and street.

This year was a pivotal change where I backfilled my Nikon with a Sony Nex, and all of these are with the Nex.  It has offered mobility, convenience, and sometimes the frustration of missed shots.

_DSC0394-BorderMaker.jpg
_DSC0786-Edit-Edit-2-BorderMaker.jpg
_DSC0906-BorderMaker.jpg
_DSC1156-BorderMaker.jpg
DSC01311-BorderMaker.jpg
DSC01362-BorderMaker.jpg
DSC01414-BorderMaker.jpg
DSC02709-Edit-BorderMaker.jpg
DSC02932-BorderMaker.jpg
DSC03010-BorderMaker.jpg

Media Sonic Enclosure

Added on by John Sturr.

Here's the heartbeat of the set up -- my drive enclosure - it's a Media Sonic with two 2TB WD Red's.  They aren't set up as raids - just drives which are mirrors of each other.  I'm a photographer - and this is where my photos reside.  Speed isn't a concern as this is just a repository - the LRoom library is on the main MacMini drive.

IMG_3388.JPG

Whenever I import photos to LRoom from my memory cards - it's a dual push to both drives.  I'm also subscribing to BackBlaze - which pings a backup to the cloud.  Backblaze is a bit different than Carbonite -- where Carbonite doesn't pull from tethered drives with the base subscription, where BackBlaze does.  A very key distinction.

Drive bay was $100 and drives run about $125 - RED's because they are robust enough for NAS enclosures and from what I've read - the WD Greens don't respond the same in enclosures.

Why not Drobo -- well - the expense is one - and the proprietary FAT has me wondering.  I'm still researching the system - I can see myself going to it eventually - just not now.  They've made some gains with the new system from what I'm reading in Scott Bourne's recent review.

I'm pretty happy with the Media Sonic - it's really quiet - and I've rid the studio of individually powered USB drives - where now they are all wrapped in one device.

Dell 2408wpf and Calibrating

Added on by John Sturr.

The Mac Mini is up and running -- LRoom installed, presets found - but the monitor was giving me fits.  I'm tethered to a Dell 2408wfp which was one of the reasons I went to the Mini, as the iMac was just too integrated - so the Mini it was.

But I digress.  As this is about calibrating the Dell 2408wfp.

In some twisted stroke of luck - Datacolor - who makes the Spyder, of which I have the Elite 3, totally brought down their site for the next few weeks.  So -- I'm not able to install this piece of hardware on another machine - as I can't access their site and download the update.

I have no loyalty toward this company after this -- none, zero.

Scouring the net, most of the info relating to calibration of this Dell 2408, was from 2008.  Your guess is as good as mine as to why this time frame is so pivotal, yet anything more recent isn't apart of the front loaded search results.  Maybe Dell changed model numbers after 2008.

I first tried to calibrate, as best I could, using the Apple Monitor utility.  I did this multiple times - and I've gotten pretty good at it - but - the colors were still "off".  Muted colors, with no pop - and skin tones were, just wrong.

Here are my settings before running the Apple Monitor utility

Brightness @ 50
Contrast @ 100
RGB @ default
Hue @ default
Saturation @ default

Calibrate with Apple Monitor utility.

Gamma @ 2.2

*** this will give you a base line for adjustment ***

Whites, Blues and Greens will look great -- the screen will be very bright though.  These Dells are really bright.

The following is my final adjustment.

Brightness @ 20 (and can probably be brought down a few clicks more)
Contrast @ 75
Red @ 90
Green @ 90
Blue @ 96
Hue @ 46
Saturation @ 80

*** The last two adjustments of Hue and Saturation will dial in your skin tones.  ***

So -- I'm about 99% there.  I would like to have the skin tones just a bit more dynamic across all images -- there is too much variation - I'm hoping the Datacolor Spyder will dial that in.

But - if Datacolor went out of business - I would be perfectly happy with these settings.

On another note -- as the sign suggests - we did get Snow - about 5" so far.

1300 East 300 South, SLC UT

1300 East 300 South, SLC UT

Tuna's and Mini's -- oh My !

Added on by John Sturr.

I've been eyeing a new PC lately - the Windows based '09 vintage is long in the tooth - and it is time for an upgrade.  Save the fact that the Windows updates fail, every day - and the whole system reboots in the middle of the night.  I have tried to figure it out - where I downloaded the diagnostic utility to work its magic - nothing -- nadda.  An ending battle.  I've given up.  Of the system the only pieces saved are the external drives and the Dell 2408 monitor.  The box is replaced by a MacMini.  Yep -- there -- I said it - Mac.  If you would have told me 3 years ago I was going to go Mac I wouldn't have believed you.

So far -- the integration and usability has been great.  I really don't care what I use - but it needs to work when I want it to work.  Done.

On another note - I found a new watch.  One of which I've been trying to figure out if I wanted to acquire for a while now.   And as luck would have it - one became available.  The Seiko Tuna Can, sbbn007.  It's out of production - but still relevant, to those who are fans of the hard use timepiece.

Mated with a Maratac Nato 4 ring Zulu, it's Money !

Seiko Tuna Can - sbbn007 - with Maratac Zulu 4 ring

Seiko Tuna Can - sbbn007 - with Maratac Zulu 4 ring

Lenses vs. Cameras and Sony

Added on by John Sturr.

Where is all of this camera non-sense going ?

I say it is all about the lenses.  But, more about that in a bit.

Sony is on a yearly hype cycle - Nex-5, and 5n last year, followed by the 7 -- and boom - Pop Photo Camera of the year - for what ever that is worth.

The body is great - but it was quickly criticized for the lenses.  The whole system just fell apart optically.  Compared to the what Olympus was putting out - Sony just couldn't compete.  AF is slow - and optic selections are limited.  The 18-55mm kit really needs to be worked - sometimes it is surprising and other times I convince myself I'll never use this again.  And then I use it again.  I have since moved to the Sigma 30mm f2.8 - whoa… I would almost venture to say, amazing - almost.

Before the Sigma 30mm -- this is the sharpest lens I had on the Nex - an adapted Canon 24mm FD SSC f2.8 - a $60 ebay buy - and probably close to 40 years old.  Focusing drove me crazy though - there was something about it where I couldn't confirm critical.

This was shot this last summer -- the sharpness seems infinite.

Mid range - this lens is crazy sharp - longer range it falls apart and turns to mush.

Trey Ratclif is using the Nex-7 of which he discusses on his site.

This year -- the two cameras with all the buzz - the - RX100 and RX-1 -- and boom - some say the 1 will be the camera of the year.  Hmmm… and the difference - full frame and a killer f2.0 Zeiss.  But the lens is stuck to the body -- no other options.  $2700.  Steve Huff is raving about it, calls it his camera of the year and DDavidson happened to get one and seems to give a thumbs up.

I would totally have one - but 3k is too much right now - and I would feel limited by the 35mm lens - and that lens only.  But -- I must say - that I always come back to JSturr's Law #1 - "One will always default to the sharpest lens, irregardless of its focal length." 

I could make it work.  I'm really intrigued by the Fuji XE-1.  If they would get it together and off the SDK Raw codec to Adobe and the likes -- I think I would be sold.  I'm loving just the JPG's - along with everyone else.

But I digress and that leads me to the next point -- what the hell has Leica been doing --- I should really have these marketing types on my staff, because they are  geniuses'.  

So where do I start - build a dog slow camera, dated sensor, no AF -- oh, and sell it for an insane price -- and Boom… winner.  And why is this system so successful - the lenses.  I'm leaving the Monochrome out of this -- but its the same deal.  Only Mono.

So what is the take away -- no matter what you are shooting - get a great lens or a very, very good lens - and go take some pictures.  When you open that new SLR in a few weeks - shelve the 18-55mm kit lens - and get a 30mm, 35mm, or 50mm f1.4, f1.8, or f2.0.  Shoot it at the Max aperture - and you will be looked at like a photographic king.  Save the kit lens for another day - for when you sell the camera.

Christmas Story

Added on by John Sturr.

I was surprised to see this replica of the Christmas Story leg lamp.  A thing of beauty, in some eyes, I'm sure.